

It is wise to get yourself a copper pan and why not? It is one of the best conductors in terms of metal and way superior in many other aspects compared to other metal!
In short, once the stove is turned on, it just takes a few minutes for the heat to spread throughout the pan evenly. The amount of heat required is less, and the distribution is more balanced. And lastly, you have better-controlling power over the temperature!
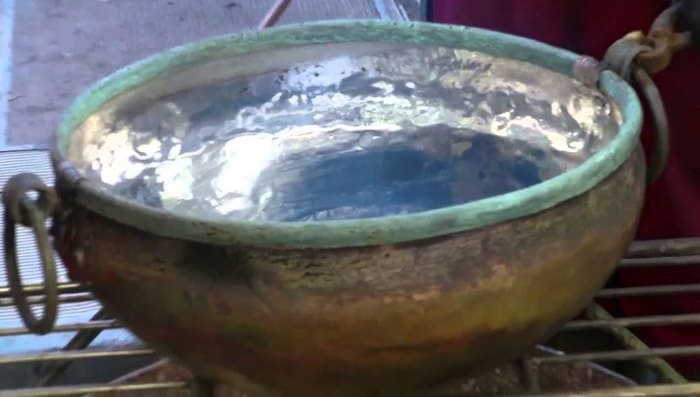
Why A Lining Of Tin?
As a reminder, copper is a very reactive material. So, lining it with tin prevents the reaction of acidic food such as tomato paste. The reaction of copper with certain food items can make the taste of the food quite weird and in fact, can also lead to food poisoning if kept for long.
Most of the new copper pans have a lining of steel making it more long-lasting.
But there are problems with this too and they are stickiness and lesser conductivity. These odds are less with steel than with tin though. The old pots found in stores are already lined with tin and have an antique look in it making them look fancier.
Things You Should Keep In Mind While Undertaking The Process
In case you got your hands on an old pan, make sure you start with taking a few measurements. You can completely trust the thickness of the pan for starters.
Another thing to look into is the heaviness of the pan. The combination of increased thickness and more weight makes it more durable. Too much thickness can also be a problem making it way too heavy for use.
The thickness of the utensil ranges between 1mm to 3mm. The heavier it is, the better. For starters, if you want a quick determinant of quality make sure that it is heavy. Older ones usually have “dovetail” joints in them which is usually produced from the hammering of copper sheets together.
Many modern models are usually free of joints. And if you are confused about the pricing then yes, it is okay to pay more for the heavier one as they are the best ones.
Steps For Tinning Copper Pots
Here all the steps that you will have to familiarize yourself with. Let’s begin;
1.Cleaning The Pot/Pan
In case you have an old pan this step is a must. Cleaning such pans might get a bit tricky, but with time, you shall ace it. Make sure you soak your pan in hot vinegar or water whichever is convenient for you.
Keep it soaked for 30 minutes to remove the grime and get your pans shining. You can scrub it as long as it is cleaned completely. Click the link and read our full coper cleaning guide
2.Pickle That Pan
Pickling is yet another important step in the tinning process. Now what you need to do is soak the pan in a bucket that has a mixture of strong acid and water.
For this step, since you are using acid, safety is a must so make sure that whatever you are doing you are doing it wearing a pair of gloves and proper protection.
The acid removes any remaining carbon, grease and also eats away the remaining tin from the pan. After a few hours, give your pan a quick, gentle wash and the last touch of a Brillo scrub inside. Now, you can finally coat it with fresh tin and conclude your tinning process.
3.Tinning that pan
To start with, sprinkle some powdered sal ammoniac on the inside of the pan. So how does it work? It simply works by the formation of smoke that is caused by the reaction with ammonia. It is better to wear masks as the smokes can cause respiratory problems.
The sal ammoniac goes through a reaction that creates smoke which in turn, creates rust. This smoke is harmful, so it is wise to wear a mask. Sal ammoniac acts as a flux and this is why the tin will stick to the pot. After the smoke starts to increase, add tin granules to it.
Now, the tin shall melt when the pot gets hot. Now, keep mixing the liquid tin and add a bit more of sal ammoniac followed by running the liquid tin with the help of a plumber’s wad and gloves.
You need to make sure the pan is heated properly so that the tin and copper can bond properly. In this process, you can see the tin to melt and reach a shiny form with a transitioning color as soon as it gets heated up.
4.Repeat The Process
The first time of everything is never perfect and it’s the same in this case as well. You are likely to get your pan coated with excess tin during your first trial, but it is completely okay.
Also, there are chances that you might end up using an excess amount of tin and thus making it rough. But yes, with repeated times, trial and errors you can surely ace this process of tinning.
For easier and even heating you can also try moving your pot around but make sure you never overheat it or else you might burn the cloth you use to wipe and prevent the bonding from taking place. For accurate and precise heating you can always use a plumber’s torch.
There might be times when you need to start from the beginning too and there can be times when the sides are not done well. In such cases, you need to redo them again.
It would have been handy for more accurate heating and there’s always the next time. But yes, this might not be your fault always, and at times it might just depend on the pan/pot itself.
Conclusion
Tinning can be a fun process, but that surely does not lighten its importance. It is a good method in case you want your pans/pots from reacting with acidic materials and also if you want long-lasting pans/pots or want to save money by using old ones.
Although, it can be tricky and quite hazardous too so it is best to make sure you have your gloves and masks on. As long as you are using caution, you are fine.