

Installing the undermount sink on the precious granite countertop is not as straightforward as with the drop-in sink.
Nevertheless, you can still do it on your own if you know what you’re doing.
But you need to be extra careful when installing this to ensure you safely get your sink in place without damaging the expensive granite countertop.
Our guide below will offer you the critical steps for properly installing an undermount sink to your granite countertop from start to finish.
Preparations for installing your undermount sink to granite
Before you get down to installing your sink, you’ll need to ensure you have everything you need for this job so that you don’t get stuck midway.
The most important tools you need for this job include:
- Undermount sink with all the necessary mounting hardware
- Power drill
- Silicone sealant
- Clamps
- Screwdriver
- 2×4 lumber board
Do you have the right sink size?
To ensure a smooth installation process, you’ll need to ensure you have chosen the right size of under-counter sink that fits in the granite countertop space you have available.
If you have already bought the sink but won’t go into your granite top, we suggest hiring a professional to cut the granite to size for you.
If you don’t find the perfect sink size for the existing hole, or if you don’t have an existing sink cutout hole, consider hiring a professional to cut the granite top to fit the sink at hand.
Some homeowners try doing the cutting on their own, but unless you know what you’re doing, I don’t advise you to carry out this part on your own. There’s a high risk involved, and you might end up damaging your granite countertop (and granite counters tops aren’t cheap!)
Follow these steps to install your new sink when you have done the necessary preparations and have everything ideally in place.
How to attach an undermount sink to a granite countertop

Step 1. Drill the holes for mounting your sink
The first step in installing your new under-counter sink is to make the holes where you’ll fasten the sink to the countertop.
For this step, you’ll first need to put your sink into place under the cabinet. Carefully center it to the opening of your countertop and ensure to perfectly align sink rims to the edges of the countertop (assuming you’re using zero reveal sink style whose walls sit flush with the edges of the countertop opening).
With the sink in place, use a pencil to mark the points where you’ll need to drill the holes on the countertop. Now carefully take the sink out and set it aside.
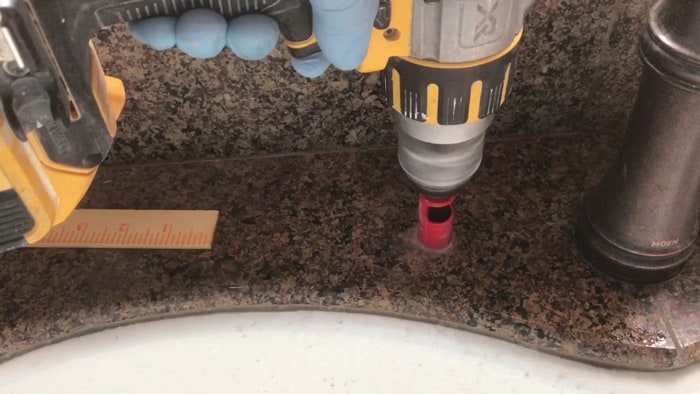
Grab a power drill with ¼ inch drill bit and make the holes on the marked spots. Make sure you don’t drill too much, as this might give you problems during sink installation.
When you’re done with the holes, use rubbing alcohol to clean the ridges and let them dry, it’s crucial to ensure the sealant will form a watertight seal between the sink and the counter.
Step 2. Apply the silicone sealant
Take the silicone sealant and squeeze out a thin layer around the lips of your sink. With the sealant in place, put the sink in place and adjust it to appear well aligned under the granite countertop.
We recommend using clear caulking, especially if you’re using a dark granite countertop. It will help give your job an overall cleaner and more professional appearance.
Give the sealant approximately 12 hours or more to dry and cure before you can start working on setting up the fittings.
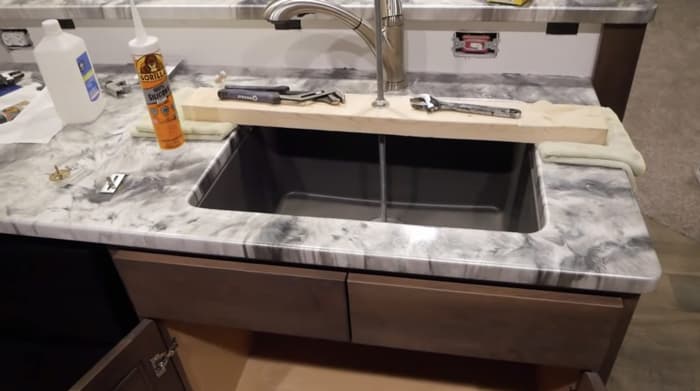
Step 3. Clamp the sink in place
Remember we said you’ll need clamps and a 2×4 board for its installation project? Well, this is where you get them to use. Use them to hold the sink in place while you install it. It will make your work easier.
To clamp the sink:
- Lay the 2×4 lumber block across the top of your granite (you can make the block sit on top of towers if you worry about your granite top getting scratched).
- Line up your sink beneath the sink opening and press it against the granite top.
- Insert one of your clamps through the sink drain and hook the other end over the block.
- Tighten the clamp to ensure it firmly holds the sink in place while the sealant dries and cures.
Step 4. Screw the sink into place
With your sink in place and sealant fully cured, you can now remove the clamp. At this point, you can go ahead and insert the wingnuts into the available screw heads.
Use your screwdriver to tighten the screws and give your sink a solid and durable installation.
Step 5. Plumbing work
Attach your sink drain and hook it up to your home plumbing system, just under the cabinet. You might want to consult the user manual to hook up your sink to the plumbing system correctly for this step. Be sure to caulk around all the threaded connections to form a watertight seal and prevent those frustrating leakages.
Step 6. Finish up the installation
Congrats! You have successfully installed an undermount style sink to your granite top. Do this one more thing to ensure you make a tight seal for your sink: apply pressure on your sink from the top area, around the edges. It will help get rid of any trapped air that can compromise the working of the seal.
Use a piece of clean towel or cloth to wipe away any excess sealant oozing out around the edges of the top of your sink. And you’re done!
Final verdict
Installing an undermount sink on a granite countertop can become a tricky process if you don’t know what you’re doing. The sink needs to go to the underside of your countertop, and you need to seal it to prevent possible leakages properly. Most importantly, you need to ensure that the undermount sink is well-supported, so it doesn’t end up pulling off from your countertop when it gets heavy with dishes and crashing down on the floor.
Follow the basic steps outlined in this guide to smoothly and correctly install an undermount sink on your granite countertop like a professional.