

Contrary to how it was even a few years ago, baking a cake is as easy as snapping your fingers now, thanks to the numerous cake mixes sitting on the racks of nearly every convenient-store in town.
Nowadays, in order to make a cake, all you need to buy is oil, a few eggs, and water (which does not even have to be purchased), along with a cake mix of your choice. However, knowing how to bake cake evenly is something that requires a lot of practice and will take a lot of time to perfect.
Regardless of which cake recipe you are following, baking an even cake is the key to making your homemade cake look professional.
Today’s topic will surely help you learn the process of baking cakes evenly and master the art of making your baked pastry look more aesthetically pleasing.
How to Bake Cake Evenly?
Let’s learn the baking process in which you can bake evenly.
Step 1: Push It Down
By this, we are not asking you to use brute force on the part of your cake that is uneven. Instead, place a clean dish towel over the hot cake and then push down on the swollen part gently using the palm of your hands in order to distribute the pressure evenly.
Doing this will help your cake release some steam, and the puffed-up, uneven part of your cake will go down and thus give you a more evenly shaped cake than before.
Step 2: Slice Off the Arched Area
This step is mainly meant for double or multi-layered cakes and is a bit trickier, and you will therefore have to be a bit more careful if you wish to carry this out.
For the first step, measure a steady height around the cake’s circumference with the help of a clean ruler. In order to make it easier to slice, cut the cake at regular intervals as you go around, taking your desired height.
Next, carefully slice through the cake at the height you just measured with the help of an indented knife and then place the cake on a dish with the cut side facing upwards.
If the other cake you baked turned out to be uneven as well do the same to that one too. By first icing the previous layer and then placing the second layer (with the cut side facing downwards) on it, you will get an evenly shaped cake. Frost the second layer however you would like before serving it.
Step 3: Avoid Bubbles from Forming
You may already be familiar with this technique from watching it on various T.V cooking shows. After your cake mixture is ready and has been poured into the cake pan, lift the pan up a few inches above the counter and gently drop it back.
This will help to distribute the batter evenly and, at the same time, will also get rid of any air bubbles that might have been present in the mix.
Step 4: Use Cake Strips
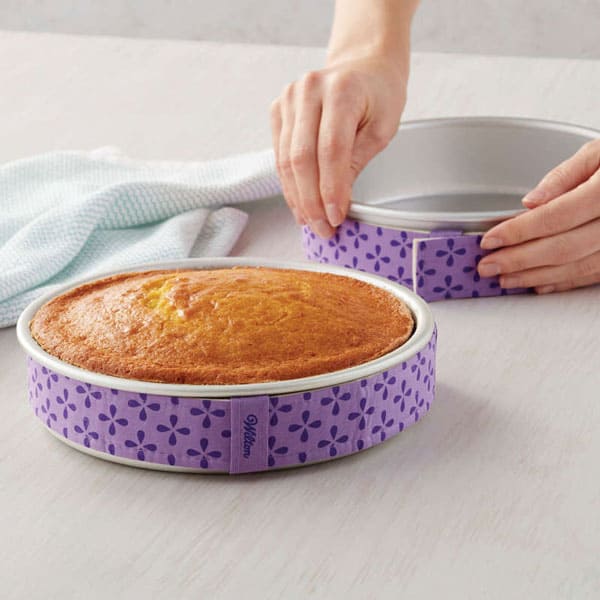
You can find ready-made cake strips at your local crafts store for a reasonable price, or you could even make some of your own. Either way, cake strips will help to keep your cake even. Here’s how you can make your own:
- Make Your Own Strips from a Paper Towel
If you wish to make your own cake strips but are unsure how to do it, simply take a paper towel and cut it into strips with the same width as your cake pan.
Afterward, wrap the paper strips in the foil and wrap it around your cake pan like how you would with regular store-bought cake strips.
- Make Strips from a Towel
If you do not have a paper towel with you at the moment, that is fine because you can also make cake strips from regular clean towels. Follow the same procedure as before and then immerse the strips in cold water (preferably ice-cold water).
Keep them there for a few seconds before taking them out and wringing them to get rid of the excess water.
However, do not squeeze so much that the strips lose their dampness too. With the help of safety pins, or even paper clips, secure the wet towel strips around your cake pan before putting it in the oven to bake the cake.
Step 5: Purchase a Cake Leveler
A cake leveler is an adjustable apparatus that helps to keep the layers of your cake even. With a very reasonable price, a cake leveler is exactly what you need if you have an important occasion coming up where you wish you bake a multi-storied cake.
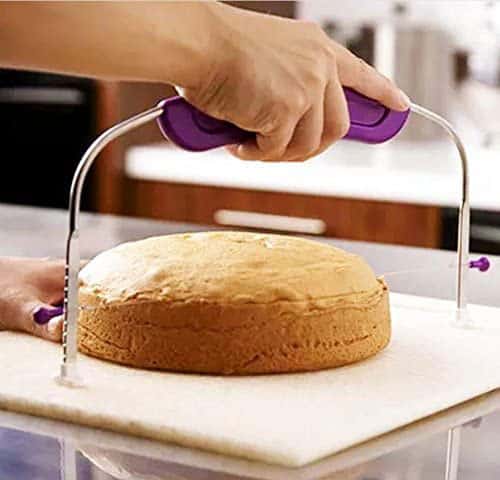
This apparatus is very easy to handle and will not require you to take measurements for your cake’s desired height with a ruler.
Step 6: Weigh Each Layer before Baking It
This tip is helpful because it enables you to regulate each of your layers’ weight and size before you even put it in the oven. If all your cake pans (with the batter inside, of course) weigh almost the same, the chances are that they will come out more evenly baked.
Moreover, by weighing the layers first, even if they are uneven, it will still be easier for you to cut the odd parts off in case you do not have a cake leveler.
What If Your Cake Has a Depression in It?
Sadly, the earlier methods we shared with you cannot be applied to your cake if it has a dent. However, what you can do is turn the cake upside down so that the more even side (which was on the bottom of the cake pan) is now facing skywards.
Since dents on cakes are usually formed at the very center, there is still a likelihood that the dip area will still work fine in holding the cake up. However, if you feel uncomfortable or if the cake is not holding up too well, try slicing around the dent a bit in order to make it a little more leveled.
Many people think that baking your already baked cake will help get rid of the dent by activating the constituents at the center of the cake. We beg to disagree here. Once your cake has been fully baked, the ingredients cannot be activated once more, and any attempts at trying to do so will only burn your cake.
How to Keep Your Cake Even When Frosting It?
After frosting the layers of your cake, cover the top outer part of the topmost layer as well and then spread the cream around with the help of a flat spreader. Next, fill up a Ziploc bag with a frosting of your choice and then ice the sides of the cake as well.
Then, with the blunt end of a knife or with a spatula, evenly spread the icing on the sides as well. If you follow these steps correctly, your cake will look professional and will also be evenly iced.
Conclusion
We hope you will have more fun baking from now on after knowing how to bake cake evenly. Even though the steps described above are beginner-friendly, they still require some amount of practice, so do not give up! Remember, regular practice and a lot of patience is the key to becoming a successful baker.